Raid report is a website dedicated to Destiny 2 players. It provides valuable information related to Destiny 2 raids, including stats, leaderboards,...
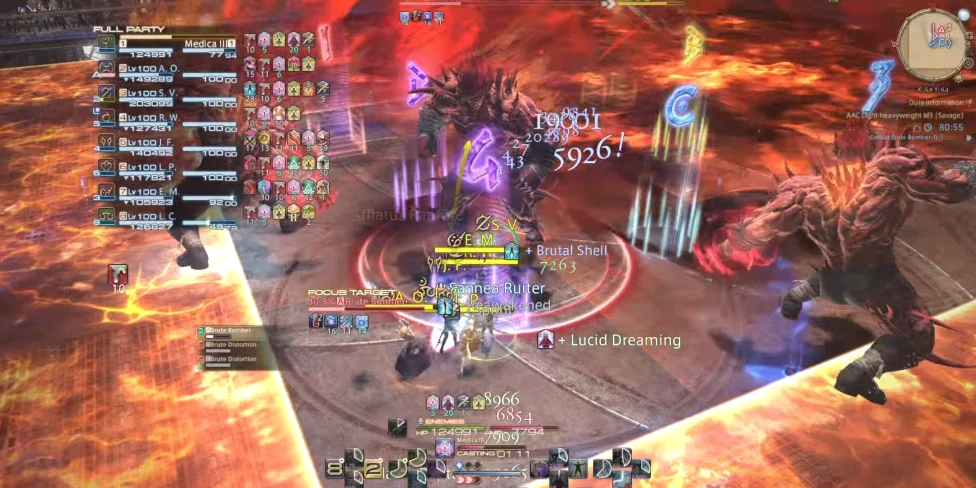
Hello and welcome to my AAC Light-Heavyweight M3 Savage guide. This guide was created to help players defeat the Brute Bomber by providing detailed step-by-step mechanic instructions for clearing and weekly farming in the future. Please note that the strat in PF may change later, and it might vary across different regions. Unlike the previous two fights, Brute Bomber has a strict DPS check, so you’ll need a crafted and pentamelded gear set, which you can either purchase on the marketboard or craft yourself, unlike Black Cat or Honey B, where you need to remember the mechanics, here you need to pay attention to the boss’s cast bar because it’s crucial to understand which mechanic is about to happen.
 Based on 4 128 reviews
  Based on 4 128 reviews
 Before we get started, we need to make some preparations, as we did in previous encounters. All players will need to be assigned clock positions and partner pairs for the upcoming sharing mechanics. Support players will be positioned on cardinals and DPS players on intercardinals. Each player will be paired with a partner marked with the same color (e.g., A and 1, both red). To maximize uptime, tanks can be paired with melee players and healers with ranged DPS players for knockbacks. As you can see, it already requires lots of teamwork and know-how to clear this fight. You can gain all of the rewards and learn the fight with professional teams with our Arcadion boost service.
The encounter begins with a Brutal Impact – multi-hit raid-wide blasts of physical damage followed by Knuckle Sandwich, which is a two-stack tankbuster.
After that, Brute Bomber will jump into the middle of the arena and start casting point-blank AOE around him. If a cast is called Quadruple Lariat, players have to share the damage with their assigned partner, and if the cast is Octuple Lariat, players have to spread on clock positions. Immediately after, Boss will face a random cardinal direction and begin to cast a Quadraboom Dive or Octoboom Dive<. This cast is proximity-based damage from the edge of the arena he is facing.

Brute Bomber will return to the center and cast another Brutal Impact, followed by Barbarous Barrage, spawning six soak towers that knock back players who stand inside them. The Starting position is a 4-man tower which is going to be North & South or West East.

This phase starts with Brute Bomber using Doping causing a fire around his chest, this will differentiate Dive into a knockback, and Lariat into a donut AOE. Tag Team will spawn 2 clones, chaining you with one of them. Final Fusedown – just like in normal mode, you will see bombs with fuses on the arena, but now players also have fuses on top of their heads.


Another random Dive into the start of the Fusefield phase. Players will now get short and long debuffs, 4 Supports, and 4 DPS. At the same time, the Brute Bomber will spawn 8 long and short fuses on the floor. The easiest way to resolve this mechanic is to count clockwise from North to locate your position, and the order is MT/OT/H1/H2 and M1/M2/R1/R2. Long fuse for long debuff, short fuse for short debuff. Once fuses are lit, short debuffs start to pop them one by one (with the same order), causing a raid-wide damage paired with Vulnerability 2s debuff meaning to delay each turn respectively. Another set of Knuckle Sandwich tankbusters into Bombarian Special.


The final phase will start from Tag Team 2, and bombs will spawn on the arena. Unlike the first variant, you will now be chained with a clone and with a Boss. Avoid the bombs and get hit by the clone and the boss at the same time. You will have to deal with another Dive, Brutal Impact, and Knuckle Sandwich.
Fuse or Foe with Infernal Spin looks intimidating but really simple in reality. You will all get bombs again, but this time you can ignore them. You are looking at a rotating cone with expanding explosions that follow the floor lines.

One set of Lariat and Brutal Impact. Pay attention here and once you resolve this mechanic, you will almost clear the fight. The very last mechanic is another set of Barbarous Barrage Towers. Handle them the same way, but once you get to the middle, use it to dodge the half-arena cleave. Just like in normal mode, it will repeat two times.
The last tankbuster followed by an identical Bombarian Special, but this time instead of knockback, Brute Bomber will cast enraged, dealing 999,999 damage.
FFXIV AAC Light-Heavyweight M3 Savage Loot
After defeating AAC Light-Heavyweight M3 Savage in Final Fantasy XIV, you will receive the following rewards:
If your 8/8 party members have not cleared the raid this week, you will find Gear Coffers with the following rewards:
This concludes the details about AAC Light-heavyweight M3 Savage in FFXIV! You can expect more intense encounters in the Arcadion Raid Series.


Subscribe to our newsletter, hot offers and giveaways and we will send you a 5% discount coupon instantly.