


Mastering Arc Raiders advanced crafting chains transforms you from survival-focused player to economy-dominating craftsman. The difference...
Arc Raiders players often overlook one of the game’s most versatile combat tools – the melee weapon system. Understanding Arc Raiders melee combat guide fundamentals transforms your close-quarters effectiveness and creates clutch survival moments when ammunition runs dry or enemies corner you unexpectedly. The current 2026 meta reveals that melee mechanics extend far beyond simple container breaking – skilled players leverage melee in PvP encounters, emergency ARC damage, and stamina-efficient movement cancellations. Whether you’re executing vertical melee strikes against flying enemies, performing stamina-recovery rolls, or climbing atop downed Bastions for execution-style finishes, mastering when to use melee Arc Raiders separates elite raiders from casual players struggling through close-range engagements.
Melee in Arc Raiders exists as a mark>supplementary combat tool rather than a primary damage source. The system deliberately balances melee effectiveness through damage-per-hit limitations, requiring skill tree investments to maximize efficiency. Unlike games emphasizing melee as viable standalone combat, Arc Raiders melee damage requires strategic timing, environmental positioning, and combined arms tactics working alongside firearms.
mark>The foundational Arc Raiders melee mechanics principles revolve around three core concepts – stamina efficiency, directional striking, and state exploitation. Every melee swing consumes stamina resources – approximately 8-12% of your maximum stamina pool per strike. This substantial consumption forces decision-making around melee usage frequency. Spamming melee attacks rapidly drains stamina, leaving you vulnerable to enemy pushes or ARC counterattacks when unable to sprint or dodge.
Directional melee strikes represent a hidden mechanic most players never discover. You can attack vertically upward against flying enemies, horizontally at ground-level targets, and even downward toward prone opponents. This three-dimensional striking system creates opportunities against targets positioned above or below your normal attack plane – enabling creative tactical executions unavailable through firearms alone.
Arc Raiders melee damage output sits intentionally low compared to competitive firearms. Base melee damage ranges from 15-20 points per strike, with skill tree investments raising maximum damage to approximately 25-30 damage per fully-upgraded hit. Comparing to rifle headshots dealing 90-150+ damage depending on weapon tier, melee strikes represent only 15-30% of equivalent ranged damage output.
This damage framework creates the critical realization – melee functions as a finishing tool, not a primary damage source. The optimal usage scenarios involve:
When to use melee Arc Raiders specifically depends on tactical situation assessment – never commit to pure melee combat expecting damage output alone to secure eliminations. Instead, layer melee tactics alongside firearms, using melee as positioning tools or emergency damage acceleration.
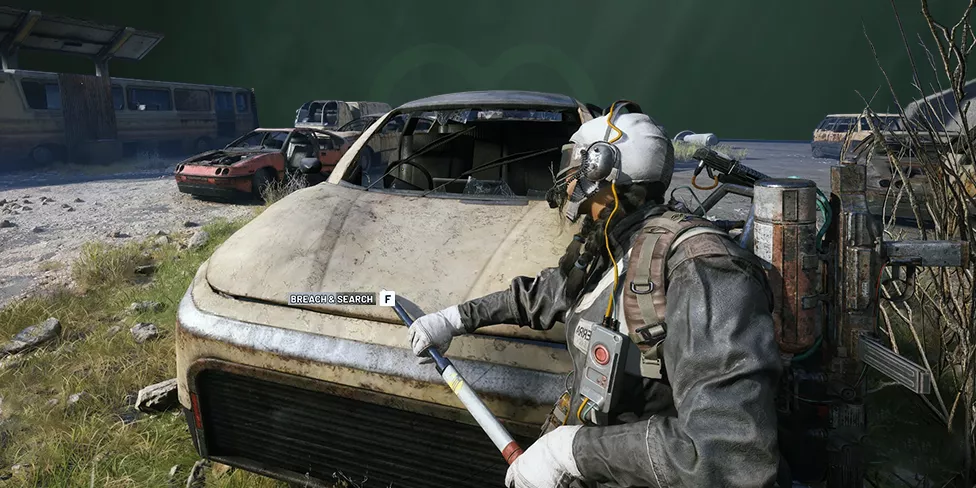
Your raider tool (melee weapon) breaks containers faster than using firearms. Compared to approximately 3-4 seconds of repeated fire required breaking containers through bullets, melee strikes reduce breaking time to 1-2 seconds. This efficiency advantage remains critical for timed farming operations where extraction timers pressure rushed looting.
Container Breaking Priority:
Your melee weapon hooks onto ziplines, allowing ascension without requiring mobility gadgets. This seemingly minor mechanic creates significant tactical advantages – you can reach elevated positions for sniper angles or rooftop extraction positions without expending gadget charges. The zipline grappling represents pure movement efficiency that experienced raiders leverage constantly.
Climbing mechanics combine with directional striking to create execution opportunities against vertical ARC units (Rocketeers, Leapers, flying Drones). When enemies occupy elevated positions, melee strikes upward connect with accuracy impossible through awkward firearm aiming angles.
The melee versus guns debate fundamentally misrepresents Arc Raiders combat philosophy. Melee isn’t supposed to “beat” guns – the comparison itself contains a category error. Melee functions as specialized utility tool excelling in specific scenarios where firearms underperform.
Melee Advantages Over Firearms:
Firearms Advantages Over Melee:
OPTIMAL COMBAT STRATEGY – initiate engagements using firearms from maximum defensive ranges. As combat closes (enemies pushing or area compression), transition melee into tactical toolkit – using melee for stamina recovery through rolling cancellations, container breaking during repositioning, and finishing wounded opponents when ammunition depletes.

Marathon Runner & Youthful Lungs (Priority Investment):
These foundational Mobility tree skills create melee combat prerequisites. Marathon Runner (5/5 points) reduces sprint stamina consumption by 25-30%, while Youthful Lungs (5/5 points) increases maximum stamina by 20-25 points. Combined, these skills provide stamina margin necessary for aggressive melee rotations without immediate exhaustion vulnerabilities.
Effortless Roll (5/5 Points):
This combat skill reduces dodge roll stamina cost by 40-50%. When combined with melee striking patterns, Effortless Roll creates “stamina loops” – strike, roll (cheap stamina cost), strike again. Elite raiders chain this pattern maintaining combat pressure while recovering stamina between engagements.
Carry the Momentum (1/1 Point – Requires 15 Mobility Points):
After performing a dodge roll, your next sprint costs zero stamina for approximately 3-4 seconds. This effect creates massive repositioning windows – roll away from melee pressure, immediately sprint full distance without stamina consumption, establish distance advantage. Combines perfectly with Effortless Roll for maximum momentum-based movement.
Survivor’s Stamina (1/1 Point – Requires 15 Conditioning Points):
During critical health situations (below 25% health), stamina regenerates significantly faster. Combined with melee rotation patterns, this skill creates clutch survival scenarios where melee striking + rolling maintains critical engagement capability despite heavy damage taken.
Fight or Flight (5/5 Points):
Regenerates fixed stamina amounts whenever you take damage during combat. This counter-intuitive skill transforms getting shot at into stamina recovery opportunities. Aggressive melee fighters abuse Fight or Flight by pushing into enemy fire specifically to trigger stamina regeneration, maintaining combat momentum despite incoming damage.
Arc Raiders melee one shot scenarios exist only in state-specific conditions:
When opponents become downed (DBNO state), a single melee strike executes them immediately without requiring second hits. This mechanic creates dangerous melee assassination tactics – push wounded opponents to downed state through gunfire, then finish with single melee execution before they crawl away or teammates revive them.
Certain ARC units (Bastion, Rocketeer, Leaper) feature exposed cores once armor plating breaks. A fully-charged melee strike against exposed cores deals triple damage (45-60 damage output). While not technically “one shot” eliminating entire units, the damage spike creates practical one-hit destruction against heavily-damaged ARC enemies.
When Bastion ARCs become knocked-down through grenade impacts, players can climb atop their chassis. From this elevated position, melee strikes execute with guaranteed critical hits (150%+ damage multiplier). A single melee execution from atop a downed Bastion typically eliminates remaining health remaining after prior damage.
Practical Execution Sequence:
Stamina economy determines melee combat viability. Without proper stamina discipline, aggressive melee rotations leave you critically vulnerable to counterattack or ARC punishment.
Stamina-Efficient Melee Rotations:
Close-range engagements separate melee specialists from average raiders. When distance compresses to 5-10 meters, firearm accuracy becomes inconsistent – this environment favors melee rotations.
Three-Tier Engagement Escalation:
Tier 1 (15-25 Meters): Use firearms exclusively. Melee engagement impossible at this range without fatal exposure.
Tier 2 (8-15 Meters): Hybrid approach – initiate with firearms, anticipate enemy closing distance. As enemy approaches, transition to melee readiness (weapon-stowed position).
Tier 3 (0-8 Meters): Melee-dominant engagement. Firearms face weapon obstruction and accuracy penalties. Execute melee rotations, maintaining stamina through roll-based repositioning.
Weapon Swap Proficiency:
Raiders who swap seamlessly between firearms and melee consistently outplay those committed to single weapon categories. Practice quick weapon stowing (Left Trigger on controller) and immediate melee initiation. The 0.5-1 second transition window determines close-range engagement outcomes.
Melee PvP Tactics Against Other Players:
Melee represents psychological warfare tool in PvP scenarios. Most raiders expect ranged engagements – aggressive melee rushing creates surprise advantage and psychological pressure. However, expecting melee alone to eliminate armored opponents remains fantasy.
Successful Melee PvP Sequences:
Players assuming pure melee combat will eliminate opponents face catastrophic failure – especially against opponents with heavy shields (80 shield HP representing significant durability). Melee’s PvP role remains supporting element, not primary elimination tool.
Can melee kill an opponent without firearms?
Only against downed opponents (DBNO state). Against fully-healthy opponents, melee alone cannot eliminate anyone before stamina exhaustion forces retreat.
What’s the fastest way to break containers?
Melee strikes break containers approximately 50% faster than firearm damage. Two melee strikes typically break generic containers compared to 3-4 gunfire seconds.
Does melee damage scale with upgrades?
Minimally. Melee damage remains fixed at 15-20 base regardless of weapon level. Skill tree investments increase this to approximately 25-30 damage maximum – still insufficient for primary combat reliance.
When should I use melee against ARCs?
Against downed Bastion units (climb atop and execute), or against heavily-damaged enemies with exposed cores. Avoid melee engagement with healthy ARC units – use firearms exclusively.
How does Carry the Momentum help melee?
After rolling (Effortless Roll reduces stamina cost), you can sprint full distance without stamina consumption for 3-4 seconds. This enables aggressive melee attack-roll-sprint rotations maintaining momentum continuously.
Is melee viable in endgame?
Not as primary combat method. Melee remains utility tool for finishing wounded opponents, container breaking, and movement optimization. High-tier combat still demands firearm proficiency.
Mastering Arc Raiders melee combat guide mechanics transforms your close-quarters effectiveness from liability to advantage. By understanding melee’s proper role as supporting tool rather than primary damage source, integrating stamina-efficient skill tree investments, and executing precise timing-based attack sequences, you’ll dramatically improve survival rates in compressed-distance engagements.
The optimal Arc Raiders PvP melee strategy philosophy combines firearms initiation with melee transitions as distance compresses. Integrate melee rotations alongside Effortless Roll and Carry the Momentum skill investments, maintain stamina discipline through roll-based repositioning, and execute finishing strikes against critically-wounded opponents. When to use melee Arc Raiders specifically depends on tactical assessment – never commit pure melee expecting solo elimination but instead layer melee tactics supporting firearms strategy.
Implement these Arc Raiders melee stamina management techniques and watch your close-quarters combat proficiency transform from experimental novelty into reliable tactical advantage against both ARC units and hostile raiders.