


Mastering Arc Raiders advanced crafting chains transforms you from survival-focused player to economy-dominating craftsman. The difference...
Arc Raiders players consistently fail at the most critical moment – getting out alive with their hard-earned loot. Understanding Arc Raiders escape routes safe exits separates successful raiders from those losing everything to extraction ambushes. Whether you’re extracting via cargo elevators, metro stations, air shafts, or raider hatches, knowing the safest paths and timing mechanics transforms your extraction phase from a nerve-wracking gamble into a controlled strategy. The current 2026 meta reveals that Stella Montis Airshaft Extract remains the safest location with only two entry points for enemies, while Spaceport Western Elevator offers consistent security with minimal ARC presence nearby.
Losing loot at extraction because of bad route choices or ambushes in Arc Raiders? Our pros map safe exits, elevator paths, metro station routes and key card extractions to minimize your risk. Learn or get carried through the safest extractions for different objectives and spawn patterns. Secure a safe extraction coaching or carry run with the Arc Raiders boosting service from Leprestore and stop dying with full backpacks.
Arc Raiders features a unique extraction system that adds genuine tension to every raid’s conclusion. Unlike some extraction shooters with free, uncontested exits, Arc Raiders forces strategic thinking through multiple extraction mechanics and environmental hazards. Every raid lasts exactly 30 minutes, with extraction points closing individually on countdown timers rather than all simultaneously.
 Based on 4 128 reviews
  Based on 4 128 reviews
 The arc raiders safe exit guide fundamentals require understanding three core mechanics – alarm activation, timer management, and ARC patrol patterns. When you activate a public extraction (elevator, metro, or airshaft), the system broadcasts a loud, impossible-to-miss alarm throughout the map. This audio cue alerts every hostile player within reasonable hearing distance that valuable loot has just activated extraction. Combined with ARC robot patrols converging on the noise, you’re essentially announcing your position to every threat on the map.
This design creates the extraction camping meta – experienced raiders simply wait at extraction points, listening for alarm sounds and setting up ambush angles while unknowing players sprint toward the elevator. Understanding this psychology is essential for surviving arc raiders evacuation elevator encounters alive.
Spaceport features four cargo elevator extraction points, three of which function as viable exits. The map’s extraction point quality varies significantly, creating strategic decision-making requirements for experienced raiders.
Located outside the danger zone, the Western Elevator provides the safest extraction on Spaceport. Minor ARC patrols occasionally pass through the area, but nothing represents serious threat levels. The primary disadvantage involves timer management – this exit closes relatively early in raids, sometimes before completing optimal loot circuits. When available, prioritizing Western Elevator extractions generates significantly improved survival rates.
Central Elevator exists in the middle of vast, open spaces with minimal cover or hiding positions. Despite the exposed location, the Central Elevator surprises players with consistent safety due to being overlooked by most raiders. When calling extraction at Central, immediately identify the half-broken construction area nearby. Hide underneath this structure – the darkness and cover position provide excellent defensive advantage while waiting for the elevator to arrive.
This extraction point frequently experiences Rocketeer ARC patrolling nearby. Minimal hideout spots exist, forcing exposed waiting during the extraction countdown. Only utilize this exit when time pressures force desperation decisions.
East Elevator represents Spaceport’s worst extraction option. Zero absolute cover exists around the terminal, requiring wait exposure in open areas. Bombardier ARC units frequently spawn around this location, creating nearly guaranteed firefight scenarios. Emergency-only extraction – all other options should deplete first.
Buried City revolutionizes extraction mechanics through metro stations instead of cargo elevators. Four distinct metro stations require accessing through metro entrances scattered across the map. This system adds parkour complexity and entry-point scouting requirements.
Eastern Station ranks as Buried City’s most accessible extraction despite camper presence. The entrance near Piazza Arbusto provides straightforward access, though windows overlooking the entrance create sightline vulnerabilities. Approach from covered positions, verify the opposite entrance tunnel for campers, then proceed with extraction confidence.
Northern Station experiences maximum traffic due to convenient entrances in the Hospital and near the Library. The popularity creates paradoxical advantage – experienced raiders avoid this location knowing extraction camping concentrates here. However, heavy player concentration means defending against potential ambush squads becomes necessary. Bring smoke grenades for sightline obstruction during the extraction window.
Western Station requires running across Marano Park during extraction approach – a vulnerable position facing distant sniper opportunities. Flying ARC units regularly spawn outside the area, adding ARC threat layers to PvP danger. Only select this exit when other options become unavailable.
Southern Station frequently closes early in raids, becoming permanently unavailable before extraction becomes necessary. Avoid routing toward this location unless absolutely forced by time constraints.
Stella Montis introduces unique extraction diversity combining metro stations with airshaft technology. Three main extraction points provide varied tactical approaches.
Located between Sandbox B and Seed Vault, Airshaft Extract stands out as the objectively safest extraction point across all Arc Raiders maps. The critical advantage involves enemy approach limitations – enemies must come from exactly two directions (left or right). This restriction eliminates surprise flanking, allows effective mine placement coverage, and creates predictable defensive positioning requirements.
The minimal entry points allow solo players to defend against squads through clever positioning. Cover both tunnel approaches with mines and tripwires, then defend from elevated positions within the extraction zone. When the extraction platform activates, enemies cannot approach from behind – all threats must push directly forward into prepared defenses.
Located underground with Bastion ARC units regularly patrolling lower levels, Loading Bay presents intimidating approaches. However, the underground nature creates camper disadvantage – most players avoid confronting Bastion ARCs, reducing PvP camping relative to other locations. The abundant dark corners provide concealment options if Bastion patrols become threatening.
Lobby Metro Station ranks as Stella Montis’s most dangerous extraction due to completely open area design. Enemies approach from above, side paths, and elevator shafts simultaneously – creating 360-degree threat exposure. The open design eliminates defensive hiding positions, forcing exposed waiting during extraction countdown. Avoid this location whenever alternatives remain available.
Based on 4 128 reviews Based on 4 128 reviews Dam Battlegrounds features consistent cargo elevator extraction points with relatively balanced threat levels across all locations.
Single weapon case spawn near extraction creates smash-and-grab farming opportunities. The extraction point itself remains reasonably safe for early-raid utilization before excessive player consolidation.
Control Tower contains consistent weapon crate spawns but experiences heavy PvP traffic. Bastion and Rocketeer ARCs regularly patrol nearby areas. Extract quickly when available but avoid lingering during late-raid phases.
Low ARC activity and minimal player traffic make Hydroponic Dome reasonably safe throughout raids. Multiple backup extraction routes exist within the area, providing flexibility if campers occupy primary exits.
Blue Gate airshaft extractions require navigating through complex puzzle room mechanics. Underground facility access dominates the extraction strategy for this map.
BATTERY PUZZLE ROOM RED ROOM EXTRACT – randomized battery panel locations unlock the map’s most high-tier loot room. Extraction from this location requires solving the puzzle first, creating natural camper awareness – most players avoid the area. Solo farmers often complete extractions with minimal opposition despite the location’s loot quality.

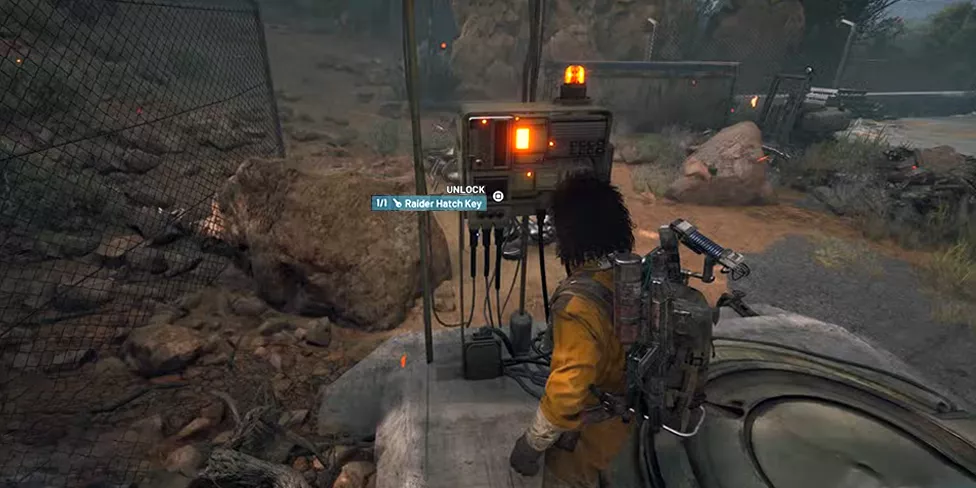
Raider hatches represent the objectively safest extraction method, eliminating alarm broadcasts and creating instant exit without countdown delay. The critical trade-off involves consumable costs – each Raider Hatch Key costs 9,000 coins, with additional 3,000 coin vendor purchase fees after daily limits.
Raider hatch advantages:
Raider hatch disadvantages:
Arc Raiders key card exit strategy – store Raider Hatch Keys in Safe Pocket before raid deployment to prevent loss if you’re downed. This guarantees key availability even after combat encounters. When approaching the hatch, locate the distinctive manhole cover and control panel. Interact with the panel while possessing the key – activation consumes the key immediately and opens the hatch without triggering alarms.
Based on 4 128 reviews Based on 4 128 reviews Extraction campers specifically await alarm activation, pre-positioning on rooftops, windows, and elevated positions overlooking extraction zones. Defeating extraction campers requires understanding their positioning and implementing counter-tactics.
Approach extraction zones cautiously without committing. Listen for equipment noise, watch for flash reflections from optics, observe rooftops for silhouettes. If suspicion arises, delay extraction calling and investigate alternative routes. Finding one camper often reveals squad positions – mark their location for retaliation planning.
When extraction alarm sounds, deploy smoke grenades immediately across camper sightlines. Smoke clouds force blind shots, reducing ambush accuracy during your sprint toward the elevator. Multiple smoke grenades create extended visual obstruction, allowing teammates to enter without exposure. This tactic transforms 90% success scenarios during elevator arrivals.
If early scouting reveals camper presence, immediately route toward different extraction points rather than forcing confrontation. Buried City’s multiple metro stations and Stella Montis airshaft options provide alternative exits without requiring public engagement. The slight route extension guarantees survival over territorial disputes.
Arc Raiders features a unique crawling extraction mechanic unavailable in comparable games. Even while knocked down and crawling (DBNO state), you can activate extraction terminals and survive.
Execution requirements:
This mechanic provides clutch survival opportunities when overwhelmed by enemy forces. If you’re close enough to extraction while losing fights, aggressive crawling toward the terminal becomes viable strategy. Even severe wounds cannot prevent extraction if you reach the terminal in time.
Each extraction point displays individual countdown timers indicating closure duration. As the 30-minute raid timer progresses, extraction points close progressively throughout the map. Late-raid phases concentrate remaining players into smaller extraction zones, creating inevitable PvP consolidation.
Strategic timer considerations:
The loud extraction alarm creates counter-intelligence opportunities. Experienced raiders deliberately call extractions to observe enemy movement patterns – watching which routes other squads utilize reveals camping positions and player concentrations.
Audio-based tactics:
Use this intelligence to delay extraction calling until chaos subsides, then extract during residual confusion when player attention disperses.
Is western elevator really safe on spaceport?
Yes. Western Elevator consistently experiences lower PvP camping relative to other Spaceport exits. ARC patrol presence remains minimal despite the exposed location. It closes early though – plan accordingly.
Can i extract while knocked down?
Yes. If you reach an extraction terminal while downed (DBNO), you can still activate extraction and escape. Custom animation plays showing your character crawling into the elevator.
What makes stella montis airshaft so safe?
Only two enemy approach directions exist (left and right tunnels). Enemies cannot flank from behind. Place mines covering both approaches and defend from elevated positions within the shaft.
Should i always use raider hatch keys immediately?
No. Reserve keys for high-value loot runs or late-raid emergency extractions. Daily vendor limits restrict key availability, so use sparingly on contested raids.
How do i identify extraction campers?
Listen for equipment noise, watch rooftops for silhouettes, observe for scope glints. Scout 30-60 seconds before calling extraction. If suspicious, route to alternative extraction points.
What’s the optimal loud-out for safe extraction?
Prioritize mobility items (faster sprint), smoke grenades (sightline obstruction), bandages (emergency healing), and shield rechargers (damage mitigation).
Mastering Arc Raiders escape routes safe exits transforms extraction from panic-driven scrambling into controlled strategic execution. By understanding map-specific extraction locations, recognizing camper positioning patterns, and implementing defensive tactics, you’ll dramatically improve survival rates during the critical final extraction phase.
Whether utilizing the objectively safest Stella Montis Airshaft Extract, leveraging silent Raider Hatch extraction routes, or executing emergency crawling extraction mechanics, the fundamental principle remains constant: scout thoroughly, maintain positioned defensive coverage, and extract decisively before final moments. Implement these Arc Raiders safe extraction guide strategies and watch your loot survival rates transform from 50-60% baseline to 80-90% elite extraction proficiency.
READ MORE